
Gluten Free Phyllo Pastry | The Complete Guide to Paper-Thin Perfection
How to Make Gluten Free Phyllo Pastry — Tips, Recipes & More
Gluten Free Phyllo Pastry: Everything You Need to Know to Make It at Home
If you’ve ever stood at a bakery window watching layers of golden, shatteringly crisp gluten free phyllo pastry and thought “that will never be me,” — it’s time to think again. For years, traditional filo dough was considered the great untouchable of gluten free baking: too thin, too fragile, too reliant on gluten’s elasticity to ever be successfully recreated without wheat. But the world of allergen-free baking has caught up, and the results are stunning.
Whether you have celiac disease, a gluten sensitivity, or you’re simply baking for someone who does, this guide gives you everything you need — the science, the step-by-step technique, the ingredient breakdowns, the storage hacks, and the best recipes to make with your finished dough. From classic gluten free spanakopita and honey-drenched baklava to delicate apple strudel, your phyllo pastry days are officially back on the table.
In this article, you’ll discover:
- What gluten free phyllo pastry is and how it differs from puff pastry
- The exact ingredients and flour blends that produce paper-thin, crisp filo sheets
- A full step-by-step technique for rolling and layering
- How to store, freeze, and make it ahead of time
- The best sweet and savory recipes to make with it
- An honest comparison of homemade vs. store-bought options
What Exactly Is Phyllo (Filo) Pastry?
Before we dive into the gluten-free version, it helps to understand what we’re actually trying to recreate. Phyllo (also spelled filo or fillo) is unlike any other pastry dough in the culinary world. It’s extraordinarily thin — we’re talking translucent, almost see-through sheets of dough — and it gets its characteristic flakiness not from layers of laminated butter the way puff pastry does, but from stacking multiple ultra-thin sheets together and brushing each one with melted butter or olive oil. The result, when baked, is a shatteringly crisp, golden, layered pastry that shatters on the bite and practically dissolves on your tongue. It’s simultaneously light and intensely satisfying, and it’s the foundation of an entire cuisine’s worth of recipes.
The word “filo” itself means “leaf” in Greek, and the dough has its origins in Turkey, having been made popular across Greek cuisine and throughout the broader Mediterranean and Middle Eastern worlds. Traditionally, phyllo dough is made from wheat flour, oil, and water — and sometimes a small amount of vinegar is added to the dough as well. The entire structure of the pastry relies on gluten — the elastic protein network formed when wheat flour meets water — to allow the dough to be stretched and rolled down to an almost impossibly thin, unbroken sheet without tearing. This is precisely why making a gluten free version of phyllo has historically been considered so challenging.
The History and Origins of Phyllo Dough
Phyllo dough has a history stretching back centuries, woven through the culinary traditions of the Ottoman Empire, Greece, the Balkans, and the broader Middle East. Street vendors and home cooks alike would spend hours hand-stretching dough over large tables, using the backs of their hands to work the dough so thin it could be draped over a newspaper and the words would still be legible through it. This ancient craft was passed down through generations, and the flavors it produced — nutty baklava soaked in honey syrup, savory spanakopita stuffed with spinach and salty feta, delicate milk custard pies — became cornerstones of entire cultural food identities. For people with celiac disease or gluten intolerance, losing access to these traditions isn’t just a dietary inconvenience; it’s a disconnection from culture, memory, and family. That’s why the development of a workable gluten free filo pastry recipe feels so meaningful.
Phyllo vs. Puff Pastry: What’s the Difference?
These two pastries are often confused, but they are fundamentally different animals. While both phyllo and puff pastry create flaky, layered results, the main difference lies in how they’re made. Phyllo is created by rolling out paper-thin sheets of dough that are stacked on top of each other, while puff pastry is made from a laminated dough, which involves layering butter between sheets of dough and then folding and rolling it repeatedly to create distinct flaky layers. Puff pastry puffs up dramatically when baked because of the steam created by those butter layers. Phyllo, by contrast, crisps up in delicate, distinct sheets that remain separate and shattery rather than puffing into a single mass. They can sometimes be used interchangeably in a pinch, but the texture and visual result will be noticeably different. For authentic Greek and Mediterranean recipes, phyllo is the one you want — and a good homemade gluten free phyllo dough is the only way to get there if you can’t eat wheat.
The Science Behind Gluten Free Phyllo
Why Traditional Phyllo Can’t Simply Be Made Gluten Free
Here’s where things get genuinely fascinating — and a little bit science-y, in the best possible way. Think of gluten like the elastic bands in a trampoline. When you work wheat dough, those gluten strands stretch, hold, and spring back, giving the dough its tensile strength and flexibility. That is exactly what allows a baker to stretch traditional phyllo to nearly translucent thinness without it tearing apart. Take gluten out of the equation, and you’re left with a dough that behaves more like wet sand than elastic dough — it cracks, crumbles, and tears the moment you try to roll it thin. For years, this made gluten free phyllo seem genuinely impossible. The traditional process of making phyllo from wheat flour relies almost exclusively on gluten when it comes to achieving its extreme, delicate thinness — in the absence of gluten, filo pastry seemed like an impossible, if awfully appealing, dream.
How Xanthan Gum and Psyllium Husk Save the Day
The breakthrough came when recipe developers started exploring two key ingredients: xanthan gum and psyllium husk. These aren’t exotic laboratory chemicals — they’re natural, widely available ingredients that function as gluten substitutes by providing the binding and elasticity that gluten would normally create. Xanthan gum helps bind the dough together and creates an elastic texture, making it possible to roll the dough thin without it falling apart. Meanwhile, psyllium husk — a plant-based fiber — forms a gel when mixed with water, and that gel adds remarkable flexibility and pliability to the dough. Adding psyllium gel into a gluten-free dough makes it much more flexible and supple, allowing it to be rolled to extreme thinness. Together, these two ingredients effectively replace the role of gluten in the dough, making paper-thin gluten free filo sheets a real possibility — not just a workaround.
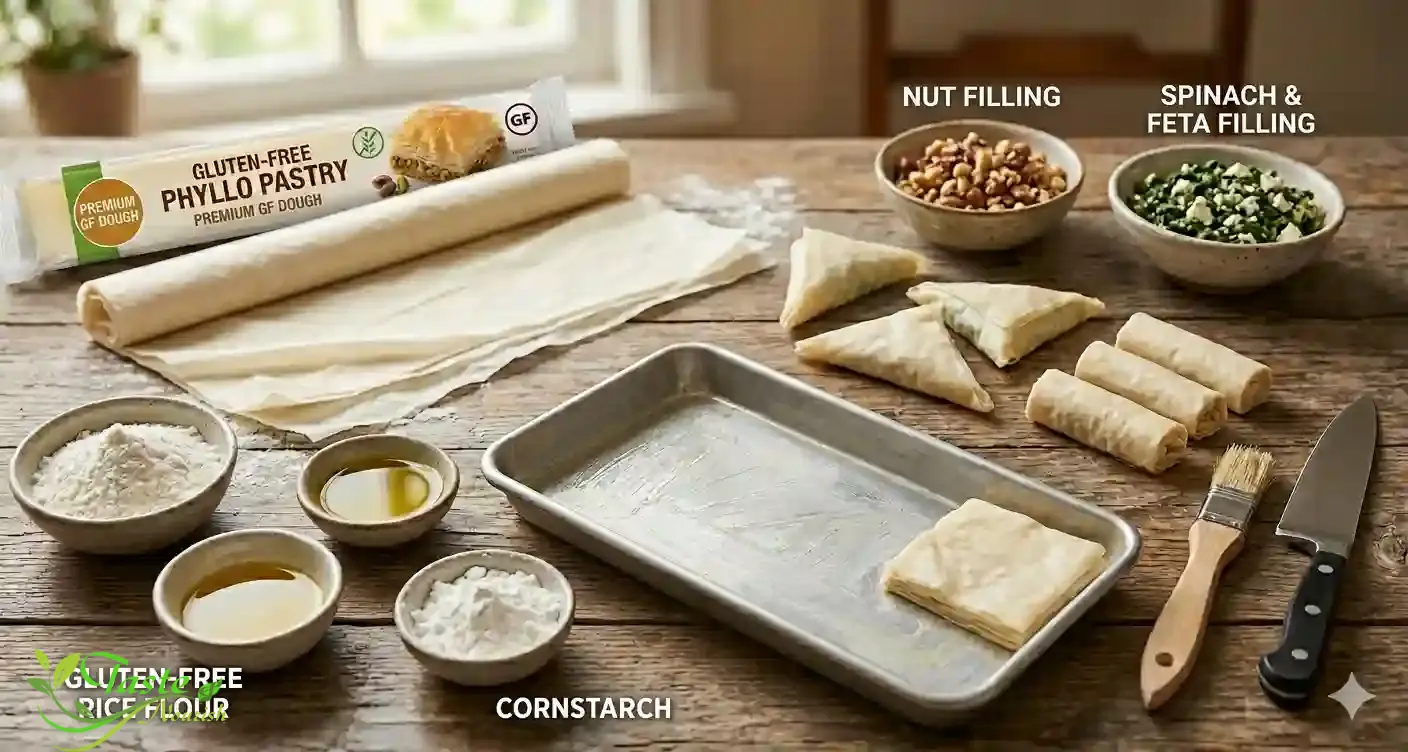
Ingredients You Need for Gluten Free Phyllo Pastry
Choosing the Right Gluten Free Flour Blend
The flour you choose is probably the single most important decision you’ll make when attempting gluten free phyllo pastry. Not all gluten free flour blends are created equal, and the wrong choice can result in a dough that’s gritty, too dense, or prone to cracking no matter how carefully you handle it. The ideal blend for phyllo should be light, fine-textured, and neutral in flavor. Popular tested options include blends based on rice flour, tapioca starch, and potato starch. Bob’s Red Mill All Purpose Gluten Free Baking Flour is one widely tested option, while others use blends combining sweet white rice flour, whole grain brown rice flour, potato starch, whole grain sorghum flour, and tapioca flour. The key is to use a blend that is finely milled, because coarse gluten free flours will produce a grainy texture that no amount of rolling will fix. Some bakers prefer to mix their own custom blends for greater control over the final result.
One excellent approach uses 200g of a plain gluten free flour blend (such as Doves Farm Freee plain white flour without added xanthan gum), a small amount of sugar, and separately measured xanthan gum. If your flour blend already contains xanthan gum, you’ll want to reduce the additional amount you add, or you risk making the dough too gummy and tough to roll. The sugar, by the way, isn’t just for sweetness — it helps the pastry brown more beautifully in the oven and contributes to that irresistible golden color. Even in savory recipes, that small amount of sugar won’t dominate the flavor profile; it just helps the pastry perform.
Essential Binding Agents and Add-Ins
Beyond the flour, your gluten free phyllo dough will need a few supporting players to really come together. Here’s a quick reference to understand the role each ingredient plays:
| Ingredient | Role in the Dough | Substitution Notes |
|---|---|---|
| Xanthan Gum | Elasticity and binding | Reduce if flour blend contains it |
| Psyllium Husk Gel | Flexibility and pliability | Mix with water before adding |
| Cornstarch | Extra elasticity; aids rolling | Can add smoothness to blends |
| Lukewarm Water | Hydrates flour quickly | Cold water makes dough stiffer |
| Unsalted Butter / Olive Oil | Tenderness and flavor | Olive oil for dairy-free versions |
| Sugar | Browning and crispness | Small amount; doesn’t add sweetness |
| Salt | Flavor balance | Use fine salt for even distribution |
| Apple Cider Vinegar | Dough extensibility | Helps dough stretch further |
Lukewarm water hydrates the flour more quickly than cold water and makes the dough more pliable — this seemingly small detail makes a real difference when you’re trying to roll the dough as thin as possible without it tearing. Similarly, that optional splash of apple cider vinegar does something almost magical — it relaxes the dough slightly, making it even more willing to stretch thin. Think of it as a spa treatment for your gluten free pastry.
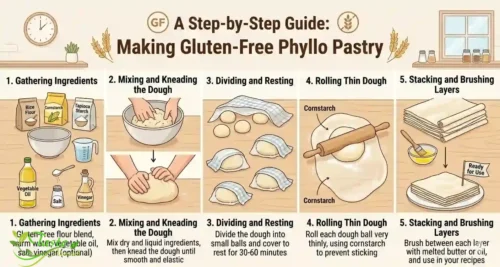
Step-by-Step: How to Make Gluten Free Phyllo Pastry at Home
Mixing the Dough
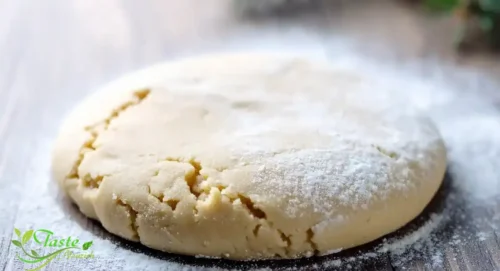
The actual mixing process for gluten free phyllo dough is refreshingly straightforward — the complexity comes later during rolling, not during prep. Start by whisking together all of your dry ingredients in a large bowl: the gluten free flour blend, xanthan gum, sugar, and salt. In a separate smaller bowl, combine your psyllium husk with about three-quarters of a cup of water and stir for a few seconds, then let it sit for a minute or two. You’ll see it transform almost immediately into a thick, gel-like consistency — that gel is doing the heavy lifting in terms of replacing gluten. Then create a well in the center of your dry ingredients, add the psyllium gel, lukewarm water, and melted butter (or olive oil), and mix everything together. The dough should come together into a smooth, slightly tacky ball that holds its shape when pressed — not sticky, not crumbly, just right. If it feels too dry, add water a tablespoon at a time; if it’s too sticky, add a small dusting of your flour blend.
Rolling It Paper-Thin: Tips and Techniques
This is where patience becomes your most important kitchen tool. Rolling gluten free filo pastry to the required thinness takes practice — your first batch may be thicker than ideal, and that’s completely okay. Divide your dough into equal portions (using a kitchen scale helps ensure consistency). Work with one portion at a time, keeping the rest wrapped tightly in plastic wrap to prevent drying out. Place a sheet of phyllo dough on a lightly floured surface and roll it into a rectangle, aiming for about 12 x 10 inches. Trim the rough edges for a neater rectangle, then dust both sides generously with flour and set aside on a piece of parchment paper. The goal is to get the dough to approximately 0.5mm thickness — thin enough that you can almost see through it, or even read text through it if held up to the light. Use a thin, lightweight rolling pin and work from the center outward in all directions, applying gentle, even pressure. If a tear appears, don’t panic — you can patch it by overlapping another sheet on top, and in a finished pastry, no one will ever know.
Getting the dough down to 0.5mm thickness takes becoming comfortable with the dough and knowing how to handle it without tearing. Practice definitely makes perfect when it comes to filo pastry, and especially gluten free filo pastry. A few tips that professional bakers use: dust your work surface liberally with cornstarch or extra gluten free flour to prevent sticking; work quickly so the dough doesn’t dry out; and if the dough starts to resist rolling, let it rest for two minutes before continuing. Just like pastry dough made with wheat, resting allows the binding agents to relax, making the dough more cooperative.
Handling and Layering the Sheets
Once your sheets are rolled, the process of using them is actually quite simple, but there’s one golden rule: keep them covered. Gluten free filo sheets dry out and crack even faster than their wheat counterparts, so work with one sheet at a time and keep the rest covered with a slightly damp kitchen towel. When you’re ready to bake, brush each sheet with melted butter or oil before layering to prevent sticking and to create that signature flakiness. This step is non-negotiable — the butter isn’t just for flavor, it’s what keeps the layers separate and distinct during baking, producing that characteristic crunch that makes phyllo pastry so extraordinary. Layer six to eight sheets for most recipes to achieve the right structural integrity, especially for savory pies like spanakopita where the pastry needs to hold a filling.
Troubleshooting Common Problems
Even experienced bakers run into challenges with gluten free phyllo pastry, and knowing how to identify and fix the most common issues will save you a lot of frustration. The most frequent problem is dough that cracks when you try to roll it, which usually means the dough is either too dry or hasn’t been given enough time to rest after mixing. Adding a small amount of additional water (one teaspoon at a time) and letting the dough rest for five to ten minutes is often all that’s needed. Another common issue is dough that sticks aggressively to the work surface — the solution is simple: use far more dusting flour than you think you need, and consider placing a sheet of parchment paper beneath the dough.
If your baked phyllo turns out soft and chewy rather than crisp and shattery, the most likely culprit is underbaking or too much moisture in the filling. Make sure your oven is fully preheated, bake until deep golden brown rather than just pale gold, and if you’re making a filled pastry, let any sautéed vegetables cool completely before filling so excess steam doesn’t soften the bottom layers. If the sheets are tearing excessively during rolling, don’t be discouraged — even tears that look catastrophic can be patched, and in layered pastry applications, a few tears are genuinely unnoticeable in the final product.
Storage, Freezing, and Make-Ahead Tips
One of the best things about mastering gluten free filo pastry is that you can make a big batch and store it for later use, which dramatically reduces the time investment on the day you actually want to bake with it. Uncooked gluten free phyllo dough can be stored in the refrigerator for up to three days, tightly wrapped in plastic wrap to prevent drying out, or frozen for two to three months. Stack the sheets with parchment paper or plastic wrap between them to prevent sticking, roll up the stack, cover with plastic wrap, and freeze. Let the dough thaw in the refrigerator before using.
For the best results when freezing individual sheets, make sure each sheet is completely cooled after rolling, dusted well with cornstarch or flour, and separated by a layer of parchment. When you’re ready to use them, thaw the entire wrapped stack in the refrigerator overnight — never try to thaw phyllo sheets quickly at room temperature or in the microwave, as this tends to make them stick together irreparably. Once baked, phyllo pastries can also be stored: baked spanakopita parcels can be kept in a closed airtight container in the fridge for up to two days and reheated in a 350°F (180°C) oven for about 15 minutes — the oven will re-crisp the pastry beautifully, while the microwave will leave it soft and disappointing.
Best Recipes Using Gluten Free Phyllo Pastry
Savory Classics: Spanakopita and Börek
Spanakopita is probably the most iconic use of phyllo pastry, and it translates beautifully to a gluten free format. The filling — raw or lightly wilted spinach combined with crumbled feta, eggs, herbs, and a generous amount of olive oil — is naturally gluten free, so the only element that needs adapting is the pastry itself. Using raw rather than cooked spinach produces an exceptionally well-textured filling, as the spinach wilts perfectly during baking without releasing too much moisture that could compromise the crispness of the pastry underneath. Whether you make individual triangles or a large pan-baked pie, the approach is the same: layer four sheets of buttered gluten free phyllo, add the filling, top with another four layers of buttered sheets, and bake at around 375°F until deeply golden and irresistibly fragrant.
Turkish börek — phyllo-based pastries stuffed with savory fillings like spiced ground meat, white cheese, or roasted vegetables — is another classic that adapts wonderfully to gluten free filo dough. The rolling and folding technique for börek is similar to spanakopita but often involves shaping the pastry into cigars or snail-shaped coils, both of which work very well with homemade gluten free phyllo. For a stunning centerpiece dish, try a coiled börek with a filling of feta, sun-dried tomatoes, and fresh herbs — it looks dramatically impressive and tastes even better.
Sweet Showstoppers: Baklava and Apple Strudel
Baklava is, for many people, the ultimate expression of phyllo pastry’s potential. Those shatteringly thin layers of golden pastry, the rich filling of chopped walnuts or pistachios, the fragrant honey syrup that soaks through every crevice — it’s one of the world’s great desserts, and making it with gluten free phyllo is a genuinely achievable project. The filling is entirely naturally gluten free (just nuts, spices, and butter), so again, the pastry is the only thing that needs modification. The technique is the same as conventional baklava: layer sheets of buttered phyllo, add a thin layer of spiced nuts, repeat, then bake and immediately pour over cold syrup to create that gorgeous, sticky glaze.
Apple strudel is another legendary pastry that works beautifully with gluten free phyllo. The classic filling of thinly sliced apples, cinnamon, sugar, raisins, and breadcrumbs (which can be replaced with gluten free breadcrumbs or even ground almonds) is assembled on a large, thin sheet of phyllo, which is then rolled up into a log and baked until golden. The key to a great strudel is rolling the phyllo as thin as possible and not overfilling — the pastry should be the star, with the fruit playing a supporting role. A dusting of powdered sugar just before serving turns it from a home-baked dessert into something that looks almost too beautiful to eat.
Store-Bought vs. Homemade: A Comparison
The question of whether to buy gluten free phyllo dough or make it yourself deserves an honest, practical answer. Here’s how the two options stack up:
| Factor | Homemade GF Phyllo | Store-Bought GF Phyllo |
|---|---|---|
| Availability | Always available (you make it) | Limited; specialty stores or online only |
| Cost | Lower per batch | Generally higher; specialty pricing |
| Thinness | Can achieve near-translucent thinness | Typically thicker than traditional |
| Flavor | Customizable; fresh | Varies by brand; may contain additives |
| Convenience | Requires time and patience | Ready to use after thawing |
| Cross-contamination risk | Controlled (your kitchen) | Depends on manufacturing facility |
| Shelf life (frozen) | Up to 2–3 months | Varies by brand |
| Celiac safety | You control all ingredients | Must verify third-party certifications |
For those with celiac disease specifically, even a commercially produced gluten free phyllo product requires careful scrutiny — shared ovens or facilities that also process wheat can create cross-contamination risks, making it essential to look for products that use dedicated equipment and separate baking days for gluten free batches. Some commercial gluten free pastry options recommend thawing at room temperature for 20–30 minutes, using potato starch or a gluten free flour for dusting, and baking between 350°F and 375°F depending on the application. For people with severe celiac disease, homemade in a dedicated gluten free kitchen remains the safest and often the most satisfying option.
Why Gluten Free Phyllo Pastry Matters More Than Ever
The numbers tell a compelling story about just how necessary this kind of recipe innovation has become. An estimated 1 in 133 Americans — around 1% of the population — has celiac disease, and up to 83% of those individuals are undiagnosed or misdiagnosed with other conditions. Beyond that diagnosed group, non-celiac gluten sensitivity has been estimated to affect up to 6% of the US population, and as many as 23% of consumers in the US are actively shopping for gluten-free products. That’s a massive, growing audience of people who deserve to enjoy every culinary tradition the world has to offer — including the delicate, layered magic of phyllo pastry. So whether you’re cooking for a celiac family member, managing a gluten sensitivity yourself, or simply exploring allergen-free baking, this guide is your definitive resource.
Conclusion
Gluten free phyllo pastry is no longer a pipe dream or a pale imitation — it’s a genuinely achievable, deeply satisfying baking project that opens the door to an entire world of culinary tradition. From the science of replacing gluten with xanthan gum and psyllium husk, to the techniques for rolling impossibly thin sheets, to the wealth of recipes that these sheets make possible, there has never been a better time to dive into the world of gluten free filo. Yes, it takes patience. Yes, your first batch might be thicker than you’d like. But with the right flour blend, the right binding agents, and the techniques laid out in this guide, paper-thin, shatteringly crisp gluten free phyllo is well within your reach. Baklava, spanakopita, strudel, börek — they’re all waiting for you. All you need is the dough.
FAQs
1. Is phyllo dough naturally gluten free?
No, traditional phyllo dough is made with wheat flour, which contains gluten. It is not safe for people with celiac disease or gluten intolerance. To enjoy phyllo pastry on a gluten free diet, you need to either make your own using a gluten free flour blend or seek out a specifically labeled gluten free commercial product.
2. Can I use any gluten free flour blend to make gluten free phyllo?
While many flour blends will work, results vary significantly. The best blends for phyllo tend to be fine-textured, neutral-flavored, and light — blends based on rice flour, tapioca starch, and potato starch tend to perform well. Avoid blends that are coarse or heavily flavored (like some bean-based flours), as these will affect both the texture and taste of the finished pastry.
3. How thin do I need to roll gluten free phyllo dough?
Ideally, you want to roll it to around 0.5mm — thin enough that you can almost see your hand through it when held up to light. This level of thinness gives you that characteristic shattery crispness after baking. Don’t be discouraged if you don’t achieve this on your first attempt; it takes practice and familiarity with how the dough handles.
4. Can I freeze gluten free phyllo pastry sheets?
Absolutely, and it’s highly recommended if you want to make the most of your effort. Stack the rolled sheets between sheets of parchment paper, wrap the whole stack tightly in plastic wrap, and freeze for up to two to three months. Thaw in the refrigerator before use, and always work quickly once thawed to prevent the sheets from drying out.
5. Why is my gluten free phyllo pastry soft after baking instead of crispy?
The most common causes of soft, chewy phyllo are underbaking, insufficient butter between layers, or excess moisture in the filling. Make sure your oven is fully preheated, brush every layer generously with melted butter or oil, let any cooked fillings cool completely before adding them to the pastry, and bake until the pastry is a deep, rich golden brown — not just lightly colored.