
How to Clean Pans with Baking Soda | The Ultimate Guide for Sparkling Cookware (2025)
If you’ve ever wondered how to clean pans with baking soda effectively, you’re about to discover the kitchen cleaning secret that’s been hiding in your pantry all along. Whether you’re battling burnt lasagna residue, stubborn grease stains, or years of accumulated grime, learning to clean pans with baking soda will revolutionize your cookware maintenance routine.
Every home cook faces the frustrating moment when their favorite pan develops those seemingly permanent burnt spots or discolored patches. You’ve probably tried scrubbing until your arms ache, soaking overnight, or even considering tossing the pan entirely. But before you give up, let me introduce you to the most effective, affordable, and eco-friendly solution available: baking soda.
In this comprehensive guide, you’ll learn how to clean pans with baking soda using proven professional techniques that work on every cookware type—from stainless steel to cast iron, non-stick to copper. We’ll cover everything from basic daily maintenance to advanced methods for tackling the most stubborn burnt-on disasters. You’ll discover why this simple household ingredient outperforms expensive commercial cleaners, how to avoid common mistakes that damage your pans, and the science behind why baking soda works so remarkably well.
What you’ll learn in this guide:
- Science-backed methods to clean pans with baking soda for all cookware materials
- Step-by-step techniques for removing burnt food, grease, and stubborn stains
- Professional chef secrets for maintaining pristine cookware
- Cost-saving tips that protect your investment in quality pans
- Eco-friendly cleaning solutions safe for your family and the environment
Ready to transform your grimiest pans back to sparkling perfection? Let’s dive into the ultimate resource for cleaning pans with baking soda—the natural solution that actually works.
Understanding Baking Soda – The Science Behind the Cleaning Power
What Makes Baking Soda So Effective?
Baking soda, scientifically known as sodium bicarbonate, is a mild alkaline compound that creates a slightly abrasive texture when mixed with water. This combination makes it perfect for cleaning because it can physically scrub away residue while chemically breaking down acidic food particles and grease. Think of it as nature’s two-in-one cleaner—a gentle scrubber and a chemical neutralizer rolled into one inexpensive package.
The magic happens at the molecular level. When baking soda encounters acidic substances like burnt food residues, it neutralizes them through a chemical reaction. This process loosens the bonds between the stuck-on food and your pan’s surface, making removal significantly easier. Plus, unlike many commercial cleaners that rely on harsh detergents, baking soda won’t damage your cookware’s finish or leave behind toxic residues.
The Chemical Properties That Matter
The pH level of baking soda sits around 9, making it alkaline enough to break down organic matter without being so caustic that it damages surfaces. This balanced alkalinity allows it to dissolve grease, which is typically acidic, while its crystalline structure provides just enough abrasiveness to scrub away debris without scratching most pan surfaces.
Additionally, baking soda absorbs odors at the molecular level. If your pan has picked up unwanted smells from previous cooking sessions, baking soda doesn’t just mask these odors—it actually neutralizes them. This property makes it invaluable for maintaining fresh-smelling cookware.
Types of Pan Materials and How Baking Soda Works on Each
Stainless Steel Pans
Stainless steel is one of the most forgiving materials when it comes to baking soda cleaning. These durable pans can withstand vigorous scrubbing and benefit immensely from baking soda’s mild abrasiveness. The alkaline nature of baking soda is particularly effective at removing the rainbow-colored heat stains that often appear on stainless steel after high-heat cooking.
For best results on stainless steel, you can be more aggressive with your application. Create a thick paste, let it sit for extended periods, and scrub with confidence knowing you won’t damage the surface.
Non-Stick Cookware
Non-stick pans require a gentler touch, and baking soda delivers exactly that. While you should never use metal scrubbers or harsh abrasive cleaners on non-stick surfaces, baking soda’s fine texture provides enough cleaning power without compromising the coating. The key is to use a soft cloth or sponge and avoid excessive pressure.
When cleaning non-stick pans with baking soda, focus on creating a thin paste and allowing time for the chemical action to do the work rather than relying on elbow grease. This approach preserves your pan’s non-stick properties while still achieving sparkling results.
Cast Iron Skillets
Cast iron presents unique challenges because you need to maintain its seasoning while removing stuck-on food. Baking soda can be used on cast iron, but with important caveats. Use it sparingly and only when necessary for stubborn residue, as it can strip away some of the precious seasoning you’ve built up over time.
After cleaning cast iron with baking soda, always re-season the pan by applying a thin layer of oil and heating it to restore the protective coating. This extra step ensures your skillet maintains its non-stick properties and rust resistance.
Copper and Aluminum Pans
Copper and aluminum are reactive metals that can benefit from baking soda’s gentle cleaning action, but they require careful handling. Baking soda effectively removes tarnish from copper, restoring its characteristic shine, while also brightening dulled aluminum surfaces.
However, prolonged exposure to baking soda can cause discoloration on aluminum, so don’t let the paste sit for too long. For copper, baking soda combined with lemon juice or vinegar creates an especially powerful cleaning solution that cuts through oxidation beautifully.
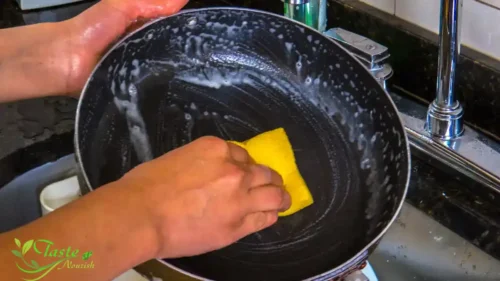
The Basic Method – How to Clean Pans with Baking Soda
What You’ll Need
Gathering your supplies before starting makes the process smooth and efficient. You’ll need baking soda (obviously), warm water, a soft sponge or cloth, and optionally, a non-abrasive scrubbing pad for tougher jobs. Some people like to have white vinegar on hand for extra cleaning power, though it’s not essential for basic cleaning.
The beauty of this method is its simplicity—you probably already have everything in your kitchen right now.
Step-by-Step Instructions
Start by rinsing your pan with warm water to remove any loose food particles. This preliminary step makes the baking soda more effective by allowing it to focus on the stuck-on residue rather than loose debris.
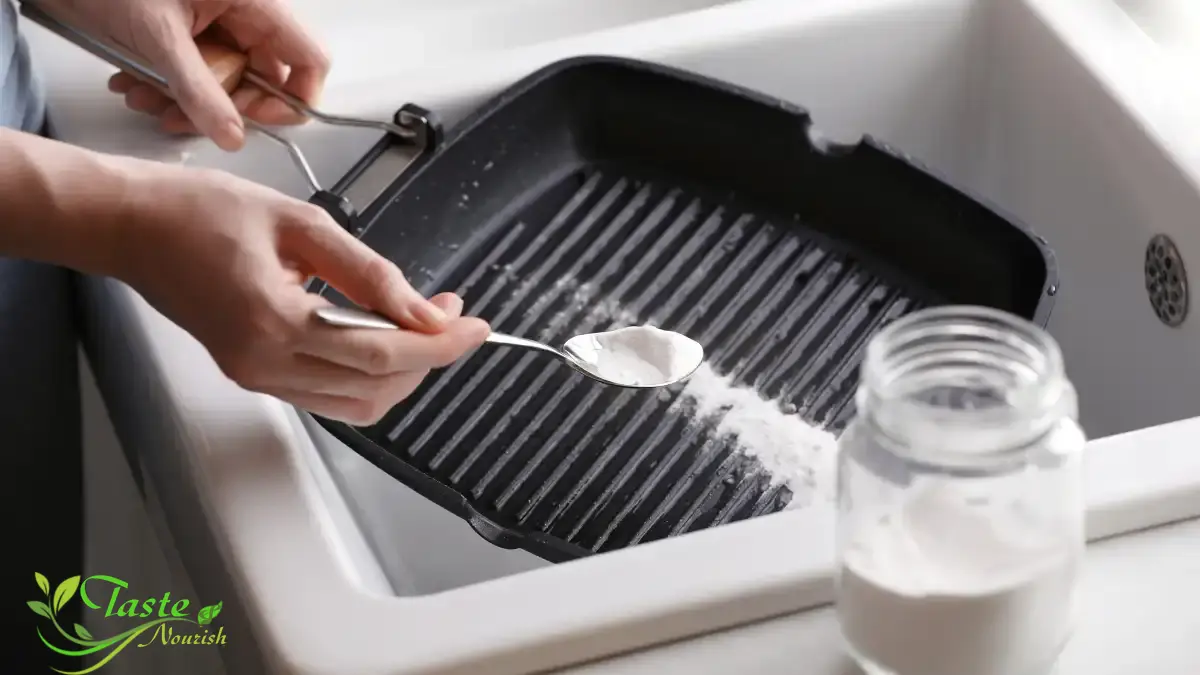
Next, sprinkle a generous amount of baking soda directly onto the wet pan surface. How much? Enough to create a light coating over the stained areas—usually two to three tablespoons for a standard frying pan. The baking soda will naturally begin absorbing moisture from the pan and forming a paste-like consistency.
Add a small amount of warm water to create a spreadable paste. You’re aiming for a consistency similar to toothpaste—thick enough to stay in place but not so dry that it’s difficult to spread. Using your sponge or cloth, gently work the paste into the stained areas using circular motions.
Let the paste sit on the pan for at least 15 minutes. This waiting period allows the chemical reaction to break down the bonds between the residue and the pan surface. For particularly stubborn stains, letting it sit for 30 minutes to an hour yields better results.
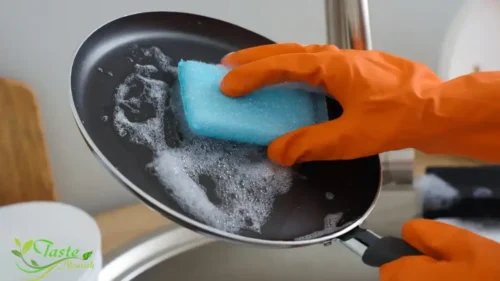
After the waiting period, use your sponge to scrub the pan in circular motions, applying moderate pressure. You’ll notice the residue beginning to lift away. For most everyday stains, this gentle scrubbing is sufficient. Rinse thoroughly with warm water and dry immediately with a clean towel.
Advanced Techniques for Stubborn Stains and Burnt Residue
The Baking Soda and Vinegar Power Combo
When baking soda alone isn’t cutting it, combining it with vinegar creates a fizzing reaction that provides extra cleaning power. The chemical reaction between the alkaline baking soda and acidic vinegar produces carbon dioxide bubbles that help lift stubborn residue from the pan surface.
Here’s how to execute this method: First, sprinkle baking soda generously over the stained area. Then, slowly pour white vinegar over the baking soda, watching as it fizzes and bubbles. This reaction is not just satisfying to watch—it’s actively working to break down tough stains. Let the mixture sit for about five to ten minutes, then scrub with a non-abrasive pad and rinse thoroughly.
This technique works exceptionally well on burnt sugar, caramelized sauces, and other stubborn organic residues that seem permanently bonded to your pan.

Boiling Method for Deep-Set Stains
For truly challenging messes, the boiling method harnesses both heat and chemical action to restore your pan. Fill the dirty pan with enough water to cover the stained areas, then add three to four tablespoons of baking soda. Place the pan on your stove and bring the mixture to a gentle boil.
Let it boil for five to ten minutes—you’ll see the burnt residue beginning to lift and float in the water. The combination of heat, water, and baking soda works together to soften even the most stubborn burnt-on food. After boiling, carefully pour out the hot water (be careful—it’s very hot!), and while the pan is still warm, scrub away the loosened residue with a sponge.
This method is particularly effective for pans with burnt food covering the entire bottom surface, where paste application might be impractical.
Creating a Baking Soda Paste for Targeted Cleaning
Sometimes you need a more concentrated approach for specific problem areas. Creating a thick paste gives you precise control over where you apply the cleaning power. Mix three parts baking soda with one part water to create a spreadable paste that’s thicker than what you’d use for general cleaning.
Apply this concentrated paste directly to the problem spots, using an old toothbrush or your finger to work it into crevices and heavily stained areas. The thicker consistency allows the paste to cling to vertical surfaces and remain in contact with the stain for longer periods, maximizing its effectiveness.
For overnight treatment of extremely stubborn stains, apply the thick paste, cover the pan loosely with plastic wrap to prevent drying, and let it work its magic while you sleep. In the morning, the stain will have significantly loosened, making removal much easier.
Specific Stain Solutions – Tackling Different Types of Pan Problems
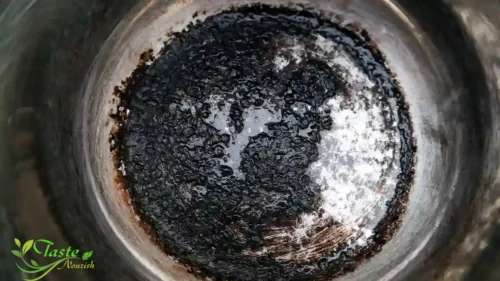
Removing Burnt Food and Carbon Buildup
Burnt food represents one of the most common—and frustrating—pan problems. That black, carbonized layer seems impossibly stubborn, but baking soda excels at breaking it down. The key is patience and the right technique for the severity of the burn.
For light to moderate burns, the boiling method described earlier works wonders. For severe carbonization, try this approach: sprinkle baking soda generously over the burnt area, then add just enough water to form a paste. Use a non-abrasive scrubbing pad to work the paste into the burnt residue using firm, circular motions. The combination of mechanical abrasion and chemical action will gradually break down even the most stubborn carbon buildup.
If you’re dealing with burnt food on the outside of the pan, flip it over and apply the same techniques. Many people forget that the outside of pans accumulates burnt residue too, especially around the edges where food and liquids spill over during cooking.
Eliminating Discoloration and Water Spots
Water spots and discoloration don’t affect your pan’s performance, but they certainly diminish its appearance. Hard water minerals create cloudy spots, while heat can cause rainbow-like discoloration on stainless steel. Baking soda addresses both issues effectively.
For water spots, create a thin paste and apply it with a soft cloth, rubbing in the direction of the pan’s grain if it has one. The mild abrasiveness of baking soda removes the mineral deposits without scratching the surface. Rinse thoroughly and dry immediately with a microfiber cloth to prevent new spots from forming.
Rainbow discoloration on stainless steel results from heat oxidation. While purely cosmetic, many people prefer their pans to maintain a uniform appearance. Apply baking soda paste to the discolored areas and let it sit for 20-30 minutes before scrubbing gently. Multiple applications may be necessary for deeply set discoloration, but patience yields results.
Dealing with Grease and Oil Residue
Grease presents a different challenge than burnt food because it’s slippery and tends to spread rather than scrub away. Baking soda’s alkalinity breaks down the acidic components in cooking oils, making them much easier to remove.
For greasy pans, start by using a paper towel to wipe away excess oil—this prevents you from just spreading the grease around during cleaning. Then apply baking soda directly to the greasy areas without adding water initially. The dry baking soda will absorb the grease. After a few minutes, add water to create a paste and scrub as usual.
This technique is particularly effective for the sticky, polymerized grease that accumulates on pan exteriors and handles over time. That brownish, tacky residue that won’t come off with regular dish soap practically melts away when treated with baking soda.
Common Mistakes to Avoid When Cleaning with Baking Soda
Using Too Much Abrasion
While baking soda is relatively gentle, overzealous scrubbing can still cause damage, especially on delicate surfaces like non-stick coatings or polished copper. The mistake many people make is thinking that harder scrubbing always equals better cleaning. In reality, letting the chemical action do the work is often more effective and certainly safer for your cookware.
If you find yourself scrubbing hard without results, stop and reassess. You likely need more time rather than more force. Reapply the baking soda paste, give it more time to work, and try again with gentler pressure.
Mixing Incompatible Cleaning Agents
Baking soda plays well with most natural cleaning agents like vinegar and lemon juice, but mixing it with certain commercial cleaners can create problems. Bleach and baking soda, for example, should never be combined as they can produce harmful fumes. Similarly, ammonia-based cleaners mixed with baking soda offer no benefits and may damage certain pan finishes.
Stick to natural combinations that have been proven safe and effective. The baking soda and vinegar duo is all you really need for virtually any cleaning challenge.
Neglecting to Rinse Properly
Baking soda residue left on your pans can affect the taste of your next meal and may even cause food to stick more readily. After cleaning, rinse your pans thoroughly under running water, ensuring all traces of white residue disappear. Follow up by drying immediately with a clean towel to prevent water spots and ensure no baking soda remains.
This step is especially important for pans you use daily—thorough rinsing ensures your cookware is truly ready for its next use.
Preventive Maintenance – Keeping Your Pans in Top Condition
Daily Cleaning Habits
The best way to avoid needing intensive baking soda treatments is establishing good daily cleaning habits. Clean your pans while they’re still slightly warm (but not hot) as this makes residue removal significantly easier. Stuck-on food hardens as it cools, so addressing messes promptly saves you effort later.
After each use, wash your pans with warm water and mild dish soap, then dry them immediately. This simple routine prevents buildup that leads to those stubborn stains requiring heavy-duty cleaning. Think of it as preventive maintenance—a few minutes after each use saves hours of scrubbing down the road.
Seasoning and Protective Coatings
For cast iron and carbon steel pans, maintaining proper seasoning prevents food from sticking and protects against rust. After cleaning these pans, even when using baking soda, always re-apply a thin layer of oil and heat the pan briefly to restore the protective coating.
Stainless steel and other materials don’t require seasoning, but ensuring they’re completely dry before storage prevents water spots and potential corrosion. Store pans in a dry location with adequate air circulation, and consider placing paper towels between stacked pans to prevent scratches.
Environmental and Health Benefits of Using Baking Soda
Non-Toxic and Safe for Your Family
In an era where we’re increasingly conscious of chemical exposure, baking soda offers peace of mind. It’s completely non-toxic—you could literally eat it (though I don’t recommend making a habit of it). This means when you clean with baking soda, you’re not leaving behind harmful residues that might leach into your food.
Children and pets can safely be around while you’re cleaning with baking soda, unlike many commercial cleaners that require ventilation and careful handling. For families with allergies or chemical sensitivities, baking soda provides effective cleaning without triggering reactions.
Eco-Friendly Alternative to Chemical Cleaners
Every bottle of harsh chemical cleaner you don’t buy is one less plastic container in landfills and one less set of harsh chemicals entering our water systems. Baking soda comes in recyclable cardboard boxes, has a minimal environmental footprint in its production, and breaks down harmlessly when it goes down your drain.
By choosing baking soda, you’re making a small but meaningful contribution to environmental protection while achieving cleaning results that rival or exceed chemical alternatives.
Cost-Effectiveness – Why Baking Soda Beats Commercial Cleaners
Let’s talk about value. A standard box of baking soda costs just a few dollars and can clean dozens of pans. Compare that to specialty pan cleaners that might cost ten to fifteen dollars for a single bottle. Over a year of regular cooking and cleaning, switching to baking soda can save you a substantial amount of money.
Beyond the direct cost savings, baking soda extends the life of your cookware by cleaning effectively without causing damage. Replacing pans prematurely due to improper cleaning methods or damage from harsh chemicals represents a hidden cost that baking soda helps you avoid. Your initial investment in quality cookware lasts longer when you treat it right.
Expert Tips and Professional Secrets
What Chefs Know About Pan Maintenance
Professional chefs rely on their cookware daily and can’t afford downtime for damaged or poorly maintained pans. Many swear by baking soda for precisely this reason—it’s reliable, readily available, and won’t damage their investment in quality cookware.
One chef’s secret: keep a shaker of baking soda near your sink for immediate spot treatment. As soon as you notice a stubborn spot while washing a pan, sprinkle some baking soda on it right away. This immediate treatment prevents stains from setting, making your overall cleaning routine much easier.
Another professional tip is using baking soda as a “pre-soak” agent. When you know you won’t have time to clean a pan immediately after cooking, fill it with warm water and add a tablespoon of baking soda. This prevents food from bonding to the surface while you’re busy with other tasks.
Time-Saving Hacks
Here’s a hack that multiplies your efficiency: clean multiple pans simultaneously by creating a baking soda soaking station in your sink. Fill the sink with hot water, add several tablespoons of baking soda, and submerge multiple pans. While they soak, the baking soda works on all of them at once. After 20-30 minutes, you can clean them all quickly with minimal scrubbing.
For regular maintenance, establish a weekly deep-cleaning routine where you treat all your frequently used pans with baking soda, even if they don’t look particularly dirty. This preventive approach stops buildup before it becomes problematic.
Troubleshooting Guide – When Baking Soda Isn’t Enough
Sometimes you’ll encounter stains that resist even the most thorough baking soda treatment. In these cases, consider whether the “stain” is actually damage to the pan’s surface rather than residue on top of it. Scratches, pitting, or degraded non-stick coatings won’t respond to any cleaning method because they represent actual material changes.
For truly exceptional cases where baking soda alone doesn’t work, consider combining methods. Use baking soda first to remove what it can, then follow up with specialized products for specific materials. For instance, Bar Keeper’s Friend (which contains oxalic acid) works synergistically with baking soda on stainless steel for those rare, impossible stains.
Know when to call it quits. If a pan has developed deep pitting, significant rust, or if a non-stick coating has degraded, no amount of cleaning will restore it. In these cases, the pan has reached the end of its useful life, and replacement is the appropriate solution.
Conclusion
Cleaning pans with baking soda represents a return to simple, effective solutions that our grandparents knew well. In our modern world filled with specialized products for every conceivable task, it’s refreshing to discover that this humble pantry staple handles pan cleaning better than most expensive alternatives.
The versatility of baking soda means you can tackle virtually any pan-cleaning challenge with confidence, knowing you’re using a method that’s safe, effective, affordable, and environmentally responsible. Whether you’re dealing with everyday grime or confronting a culinary disaster, baking soda provides the solution.
Start incorporating these baking soda cleaning techniques into your kitchen routine today. You’ll be amazed at how this simple shift transforms your cookware maintenance, saves you money, and gives you peace of mind about the products you’re using in your home. Your pans—and your wallet—will thank you.
FAQs
1. Can I use baking soda on all types of pans without worrying about damage?
Baking soda is safe for most pan materials including stainless steel, cast iron, ceramic, and copper when used properly. However, use a gentle touch on non-stick coatings and avoid prolonged exposure on aluminum to prevent discoloration. Always test on a small area first if you’re uncertain about a particular pan.
2. How long should I let baking soda sit on a burnt pan before scrubbing?
For light to moderate stains, 15-20 minutes is typically sufficient. For heavily burnt pans, letting the baking soda paste sit for 30 minutes to an hour yields better results. For extreme cases, you can even leave it overnight, though this is rarely necessary if you use the boiling method for severe burns.
3. Is it safe to mix baking soda with dish soap for cleaning pans?
Yes, mixing baking soda with a small amount of dish soap is perfectly safe and can enhance cleaning effectiveness. The soap helps break down grease while the baking soda provides gentle abrasion and odor absorption. This combination works particularly well for routine cleaning of moderately soiled pans.
4. Why does my stainless steel pan have rainbow stains, and will baking soda remove them?
Rainbow stains on stainless steel result from heat oxidation and are purely cosmetic. Baking soda effectively removes these discolorations when applied as a paste and allowed to sit for 20-30 minutes before gentle scrubbing. For stubborn rainbow stains, you may need to repeat the process or combine baking soda with white vinegar for extra cleaning power.
5. Can baking soda remove the seasoning from my cast iron pan?
Baking soda can potentially strip some seasoning from cast iron if used aggressively or frequently. Use it sparingly on cast iron, only when necessary for stubborn residue, and always re-season your pan afterward by applying a thin layer of oil and heating it. For routine cast iron cleaning, hot water and a brush are usually sufficient.
Scientific Sources:
- Journal of Food Science – “Cleaning and Sanitation in Food Processing Environments” – https://ift.onlinelibrary.wiley.com/journal/17503841
- National Institutes of Health – “Sodium Bicarbonate: Properties and Applications” – https://pubmed.ncbi.nlm.nih.gov/